Gift Certificates are a great sales tool as they not only bring in extra cash, but bring in new potential members! Today, we are going to share with you our best practices for selling gift certificates or gift shares through Farmigo. If you have questions about selling gifts through Farmigo, reach out! Contact us at [email protected]. We would be happy to talk to you about it.
Click "Read More" to learn how to manage gift certificates.
Click "Read More" to learn how to manage gift certificates.
Selling Gift Certificates in the Web Store
The terms of your gift certificate will be specific to how your CSA operates. We recommend using coupon codes to track the use of a gift certificate.
Setting up Gift Certificates
- Create a Gift Category: If you want to set up Gift Certificates, email support and ask us to add a category for you called "Gifts" or "Gift Certificates"
- Create new store items for each amount of gift certificates you want to offer: You may decide to offer a gift certificate tailored to a specific share or payment plan, or, you may decide to offer a gift certificate for a fixed dollar amount. You will need to set up these gift options as Store items from the Items manager in your Dashboard.
- Ask Farmigo to customize the message that appears above the store comments box: We can set up a comments box where the gift buyer can give you information like who the gift is for and a message to send them. Here is some suggested text: “If purchasing a Gift Certificate, please indicate below the name of the recipient and the name of the sender that you would like to appear on the certificate:”
Below is an example of how Naturally to Your Door has set up Gift Certificates for their members.
Instructions for Members to Purchase Gift Certificates in the Web Store
These instructions are expressed from the member's perspective:
- Log in to the Web Store as usual to make a purchase.*
- Select the desired gift certificate.
- Click "CHECKOUT." Agree to the terms and select your payment method.
- In the comments box below, indicate the name of the recipient and the name of the sender that you would like to appear on the Gift Certificate
Identifying Who Ordered Gift Certificates
The next step is to find which members have placed orders for gift certificates:
- Go to the Reports manager (under the Status menu in your Dashboard) and select the Distribution Report.
- Generate a Distribution Report based on the following parameters:
- DELIVERY DATE: Set to the relevant date for the store order
- ROUTE: Set to the relevant Route or leave All selected
- SHOW: Select “Include Members”
- INCLUDE: Select Orders Only
- CATEGORY: Select the title of the category where your gift certificates are posted in the web store
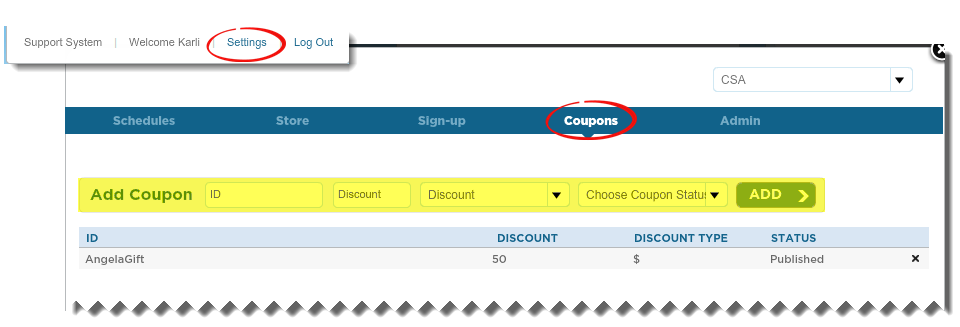
Generating Redeemable Gift Certificate Codes
We recommend setting up unique coupon codes that will act as gift certificates in sign-up.
To create a unique coupon code for that gift certificate:
To create a unique coupon code for that gift certificate:
- Go to the Settings link at the top of the Dashboard and look under the Coupons tab (found in the dark blue band running across the top)
- Add a Coupon. Enter a unique ID, the amount for the gift certificate, select $ Fixed amount discount from the drop down, set the status to published.
- Press Add
- Save Changes
- Deliver the Coupon Code & Gift Certificate
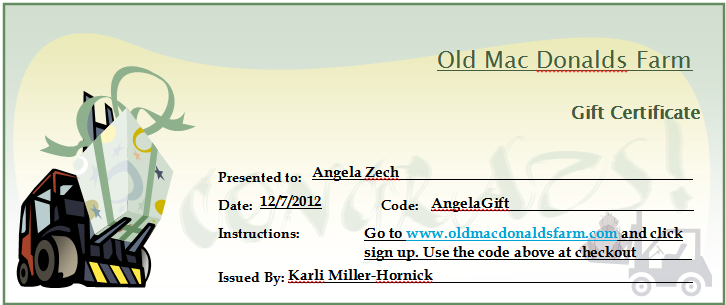
Delivering Gift Certificates
First, you will need to design and create your certificates. Microsoft Office has very easy to use gift certificate templates. To learn more about creating a gift certificate in Microsoft Office, click here.
Next, you will need to decide how you want to deliver these gift certificates. You will want to include the details for delivery in the “Automated Email – Web Order Confirmation” and in the description of the item. Here are some options to consider:
Next, you will need to decide how you want to deliver these gift certificates. You will want to include the details for delivery in the “Automated Email – Web Order Confirmation” and in the description of the item. Here are some options to consider:
- Pick-up: Whether the buyer is a member or guest at the web store, the purchaser of the gift certificate will have to select a pick-up location at which they receive their items. You can simply deliver the gift certificate at the selected location on the next delivery date.
- Email a printable file: Create an electronic certificate that can be emailed to the buyer once they have purchased the gift certificate. This way the buyer can easily print and deliver the coupon code themselves at their convenience. You will want to email this file to the purchaser outside of the Farmigo Dashboard.
- Mail the certificate directly to the recipient: As part of the text for the comments box (see item 3 above) ask the purchaser where they would like you to send the gift certificate.
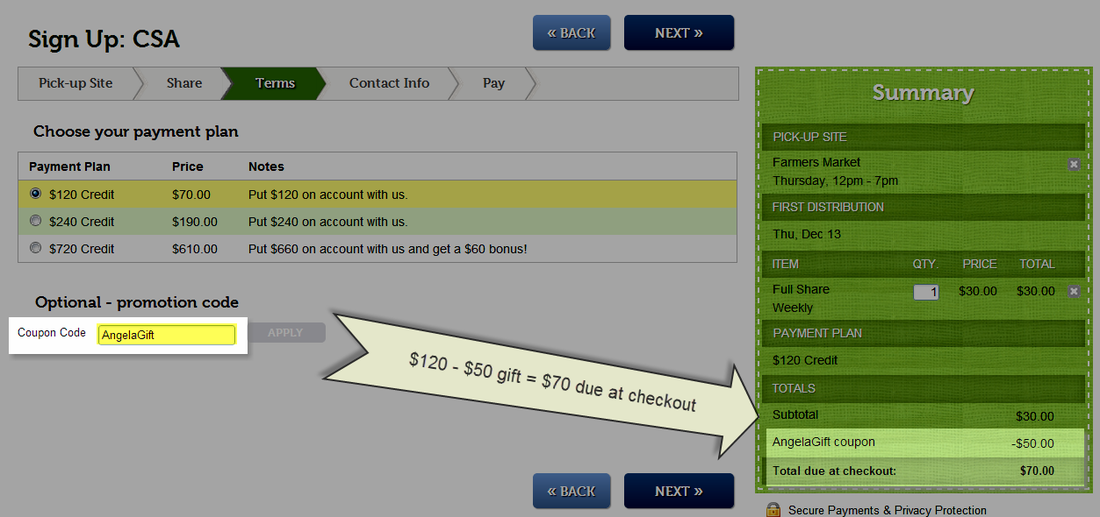
Redeeming a Gift Certificate
When the recipient is ready to use their gift certificate code and set up their subscription, they will take the following steps:
- Go to the sign-up link (www.farmigo.com/join/FARMNAME)
- Choose a pick up location
- Choose a share
- Choose a desired payment plan
- Enter the gift certificate code where it says coupon code in the Terms step of the sign-up process
- Create an account
- Agree to terms
- Complete Sign-up
Advisor Tip!
*** NEW FEATURE: LINK DIRECTLY TO A CATEGORY OR ITEM***
We can now link directly to a category or item in your web store. When sending out advertisements for gift certificates, you could link directly the the gift certificate category in your web store!!! Watch the slideshow below to learn how to find the direct link:
We can now link directly to a category or item in your web store. When sending out advertisements for gift certificates, you could link directly the the gift certificate category in your web store!!! Watch the slideshow below to learn how to find the direct link: