Farmigo Support
  • HOME
  • Browse Help & Support
  • Farmigo Mobile
  • Tip of the Week
  • Why Farmigo?
  • Contact Support

Educate and Entice Members with Newsletters

4/24/2012

 
In the connect module, Farmigo presets automated emails to help message members when they take an action in their account (ie sign up, send a payment, etc).  Along with these automated emails, CSA members we've interviewed say they enjoy receiving weekly or monthly newsletters from their farms that educate them about the items in their boxes and update them about what is going on at the farm.  

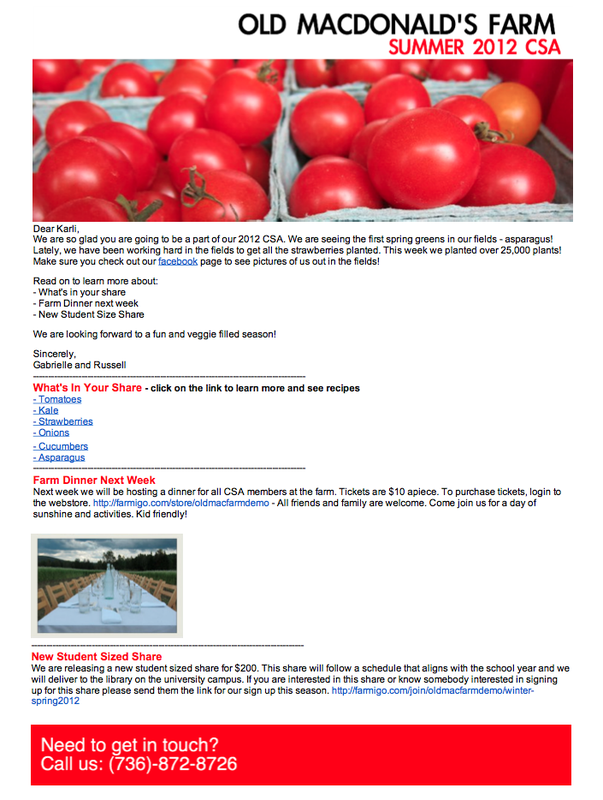
Today's Tip of the Week is about how to format newsletters so they represent your farm brand and become a dynamic message that encourage members to visit your farm website, social media, make additional purchases in your web store, and more. Below is an example of a newsletter built as a Farmigo template for Old MacDonald's Farm. To learn how to build a template with images, hyperlinks and formated text, continue reading!
Picture

How to Build Your Own Newsletter

The Formatting Bar
Picture
The formatting bar allows you to edit the font style, insert hyperlinks, and insert images.
  1. Edit font style: Select bold, italic, or underlined. Then select font and font size. To edit the color of specific text, highlight it then click on the color box and select the color you prefer. 
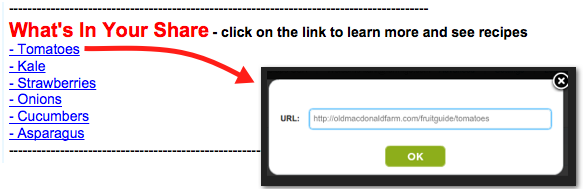
  2. Insert Hyperlink: To insert a hyperlink, select the text you would like to hyperlink. Then click the insert hyperlink button and enter the web URL. The text should become underlined when you do this.
  3. Insert Image: Edit your images using a photo editing software or upload them to photobucket and edit online. Once the photo is uploaded to your web album go back to the email template you are formatting and place the cursor where you would like the image to appear. Click on the insert image link and paste the image link and press ok. To remove an image, place your cursor in front of it and press delete.

Creative Formatting Tips

Picture
Creating a Header and Footer
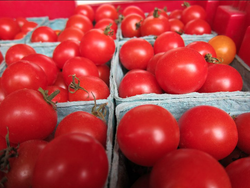
To create a header, first select an image that you feel represents your farm. I chose this one of ripe cherry tomatoes. Upload the image to photobucket or edit it in an offline photo editing software. I cropped this image to make it thinner, then resized to make it fit the width of the email. After finding the proper size, I wanted to add my farm name and the season to the top. To do this in photobucket, switch to the photobucket advanced editor. Here, you can add a box on top of the image and add text. 

The process for creating a footer is the same.  This is a good place to enter contact details for the farm like a phone number and address. 

Optimal Width: 850

Dynamic Fields Customize Emails 
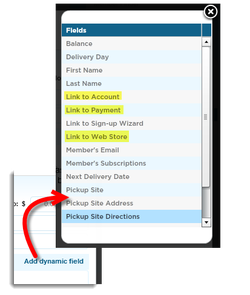
Give newsletters a personal touch by using dynamic fields to automatically fill in member information. In the example above, I used the dynamic field [First Name] to address each member personally. To learn how to insert dynamic fields and understand what each dynamic field represents, click here.
Hyperlinked Text Helps Educate Members
Changing the color and font of section titles will help them stand out. Many times members come across new produce in their box that they are not familiar with. By hyperlinking each item back to your website that provides an item picture, description, and possibly recipe, you will help your members to make the most of their CSA.
Picture
Provide Links to Webstore to Entice Members to Shop!
Newsletters are a great place to advertise newly available produce and other add-ons from the web store. Include the dynamic field [Link to Web Store] to entice members to make additional purchases in your web store.
There are so many creative ways to use your newsletter to educate members. Some more of our ideas include:

-  Encourage your members to interact with your social media sites by hyperlinking text

-  Insert links to your sign up wizard and ask members to invite their friends to sign up

-  Separate into manageable sections by using dashes

These are a few of the many creative things you can do in a newsletter. What are some things that you do in your newsletter? Comment below to share!

Email Alerts Help You Remind Your Members

4/19/2012

 
One of the goals that we share as champions of the local food movement is to reduce as much waste as possible.  While your members want to support this goal as well, they can be forgetful at times.  Email Alerts are a useful tool in Farmigo to set up automatic reminders for your members to pick up their share that week.  They can also help you remind your members to visit the web store or make an additional payment.

Today’s Tip of the Week discusses how Email Alerts can increase the efficiency for managing subscriptions.  For more information about how to create an Email Alert, visit our Help Site.


“Delivery Date” Email Alerts
To send an automatic email to a member based on a specific number of days before their next delivery, use the “Delivery Date” Email Alert type and enter the number of days before the member’s delivery date that you want the member to receive this alert. This automatic alert will not be sent to members whose account is on hold.
Picture
Picture
Use the “Delivery Date” Email Alert to ...

Remind Members About their Next Delivery:  This especially helpful for members who may not be receiving their subscription order every week.  When creating the Email Alert template, consider using the dynamic field for [Link to Account] and encourage your members to review their pick-up site directions and check their account balance.

Encourage Members to Check Out the Web Store:  Create an Email Alert so that it will be delivered 6 days before the member’s next delivery and remind them to check out the web store. Add the dynamic field for [Link to Web Store].  This automatic alert will encourage members to select more add-ons for their next delivery.


“Balance” Email Alerts
To send an automatic email to a member when their balance falls into a specific range, use the “Balance” Email Alert type and enter the lower limit of the balance range in the first box and the upper limit in the second box.  This alert email is sent once per week as long as the member’s balance falls within the defined range.  This alert type is only available for CSAs that have been set up in Farmigo for ongoing deliveries; this alert is not available for CSAs that manage finite seasons. 
Picture

Create “Balance” Alerts for multiple ranges to …

Warn members that their balance is running low:  If you do not have automatic payments set up for all of your members, create a “Balance” alert email with a range between your least expensive share and your most expensive share.  When you member’s balance falls within this range, it is very likely that after their next delivery their balance will be zero or become negative.  Include the dynamic field for [Link to Payment] so that they may make a payment.  These alerts WILL be sent to members that have the recurring payment token on their accounts.  You may want to include a sentence like "If you have signed up for automatic payments, this is just a courtesy notice that an automatic payment will soon be charged."

Alert members that their balance is negative:  For example, set the condition to "Sends email when member's balance is greater than or equals to: $ -50 and lower than or equals to: $ 0.” In the “CC:” field, insert the email address for the person responsible for late payments. Please note, however, that these alerts will NOT be sent to members with an echeck payment in process. 


How do YOU use Email Alerts?
Please share a comment about how you currently use Email Alerts in Farmigo.  Do you have any great tips for your fellow CSA administrators?  Do you have any ideas about how Farmigo may improve Email Alerts?

For more information about how Email Alerts work, please visit our Help Site. 

Meet the Farmigo Support Team

4/10/2012

 
Hello Everyone,

Time flies when you’re having fun!  I can’t believe I’ve already been at Farmigo for over a month.  I would like to take this opportunity to introduce myself and the Farmigo Support Team.
  
Picture
I am Stephani, the Farmigo Customer Support Manager.  I have been working in technology and support for the past 18 years.  I went to Rutgers NJ for undergraduate study In Sociology and Psychology and earned my MBA in Technology Management at the University of Phoenix.  I grew up in the Garden State and can remember my grammar school class trips to the Old Wagon Farm, apple picking with my family, eating my Grandmother’s homemade cranberry sauce at Thanksgiving, and let’s not forget Jersey Tomato sandwiches which are still one of my favorites.  I was lucky to grow up around so many farms.  I currently belong to a local CSA, try to know my food and cook at home as much as possible.  I am finally combining my work and personal life and am someplace I am passionate about.  I am home at Farmigo and am excited about working with and getting to know you all. 

Picture
With a bachelor’s in theatre and a master’s in psychoanalysis, Steven naturally gravitated towards computers.  After spending most of his career working on software for the financial industry (and eating his fair share of fast food), Steve met his wife.  She belonged to a CSA and he found out what a beet really tasted like.  When the opportunity came to meld his software knowledge with his passion for local food, Steve jumped at the chance.  He has never looked back. 

Picture
Angela has always had an interest in food and cooking, her passion for agriculture and the food movement took root during her service as a Peace Corps Volunteer in West Africa.  As she worked with farmers every day in West Africa, it was easy for her to see that farmers are the foundation of the economy.  This is just as true in the United States even though farmers represent a smaller portion of the population.  When she returned to the United Stated, she began working with a software company focusing on social media marketing.  She is excited to be working for Farmigo today where she can combine both of these experiences and talk with farmers every day!  On another note, Angela is a graduate of Penn State University and an avid fan of the Nittany Lions! 

Picture
Karli believes food tastes better when shared with friends.  It also helps if it was grown by friends!  A graduate from the Cornell School of Hotel Administration, Karli has always had an interest in food and its power to bring people together.  While in Ithaca, she discovered the wonders of the farmers' markets, a place where the community gathers to shop, eat, and learn - it was a love match.  Her new found appreciation for fresh veggies drove her to enroll in the Groundswell New Farmer Training Program where she received a certificate in sustainable farming.  She believes that CSA programs not only provide the freshest, tastiest food there is, but also foster communities and friendships. 

Picture
Ran is Famigo’s Development Operations Manager. His job is to implement efficient testing and development processes and assure that the products we are releasing will have the highest quality.  Ran has been with Farmigo for over 2 years now; almost from the beginning when we had started with very few farms.  In the last year Ran was also working as a support advocate, and now that we have established this wonderful team he'll mainly assist the Support Team with helping the farms and food producers with technical issues and requests. 
Ran's experience is from the Hi-Tech industry where he served in different technical and managerial positions for more than 13 years. The only farms he knew before he joined Farmigo were server farms.  Even though farming and sustainable food was something new to him, he quickly learned to love what he’s doing, and believes we are doing something really important.  He has also joined a CSA and is educating his 3 boys to eat healthier food.

Using the Charge and Manage Buttons

4/1/2012

 
The charge and manage buttons appear on subscribed members cards in the subscription module. Today's tip is a quick review on what these buttons do. These buttons are used to make one-time charges and manage information related to a member's bank account (ACH) or credit/debit card information through authroize.net. Neither the charge button nor the manage button can be used to edit a member's paypal information. 

Never noticed these buttons? Below is a screenshot of where they will appear on a member card.
Picture
Charge Button
The charge button is only available if you have set up your system to allow members to add payments via e-check or credit card. The charge button is used to make a one time charge to a member who is set up with e-check or credit card payment.  When the admin uses the charge button, it will actually charge the member's account and will add a record to the payment tab of the member's card.

To use the charge button, enter the amount you would like to charge the member. Then select payment method. Depending on which method you choose, you will be prompted to enter payment details. Once all the information is entered, press the Charge button. 

We don't find that this button is used very frequently, but sometimes a payment fails or the CSA manager makes a sales agreement with a member outside of the system and needs to charge the member. If a payment fails, you have two options. The member can login to their account and make the payment on their own or you can charge the member through the dashboard.  To charge the member, enter the amount of the payment, select the payment method, fill in the payment method details and press charge.
Picture
Manage Button
The manage is where you can edit a member's payment method information in a secure environment. If a member contacts you to change their bank account or credit card info, go into their member card and press the manage button. Then, select the payment method. A window will open that allows you to edit their payment information.

The manage button is usually used in two situations. 
1. The member is already set up on a recurring charge (i.e. prepay, installments) and wants or needs to change their payment information because their credit card expired, they changed their bank account, etc.

2. The member is not set up on a recurring charge, but they would like to be. The member can either login to their account and set this up via the make payment page or the admin can set it up for the member. This would be used mostly by a year-round farm.  

When you click the manage button, a window will pop up giving you the option to edit either the Bank Account (ACH) information or the Credit or debit card information. Once all required information is entered, the Save button will become turn dark blue, indicating that it is clickable.

Select payment method to edit:
Picture
Bank account (ACH)
Required fields include: First Name, Last Name, Bank Account Number, Routing Number, and the Last 4 digits of Social Security Number. 
Picture
Credit or debit card
Required fields include: First Name, Last Name, Address, City, State, Zip Code, Card Number, Expiration Date, and CCV Code. 
Picture
To sum it up, the charge button is where you go to make a one-time charge on a member's account via e-check or credit card and the manage button is where you can edit the information attached to these accounts. I hope this clears up some of the mystery behind these two buttons. I know you are all busy in the fields this week. I wish you good weather and be safe!

    Subscribe to the tip of the week mailing list

    Categories

    All
    Accounting & Finances
    Communicating With Members
    Dashboard Management
    Images & Photos
    Knowing Support
    Managing Deliveries
    Managing Locations
    Managing Payments
    Managing Sign Ups
    Member's Perspective
    Reports
    System Updates And New Features
    Web Store

    Archives

    March 2014
    February 2014
    January 2014
    December 2013
    November 2013
    October 2013
    September 2013
    August 2013
    July 2013
    June 2013
    May 2013
    April 2013
    March 2013
    February 2013
    January 2013
    December 2012
    November 2012
    October 2012
    September 2012
    August 2012
    July 2012
    June 2012
    May 2012
    April 2012
    March 2012
    February 2012