Farmigo Support
  • HOME
  • Browse Help & Support
  • Farmigo Mobile
  • Tip of the Week
  • Why Farmigo?
  • Contact Support

Coming Soon: More Accurate Logistics Reports

8/28/2012

 
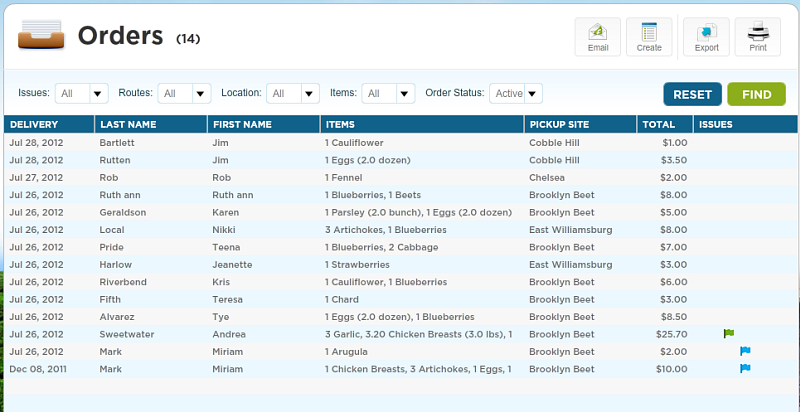
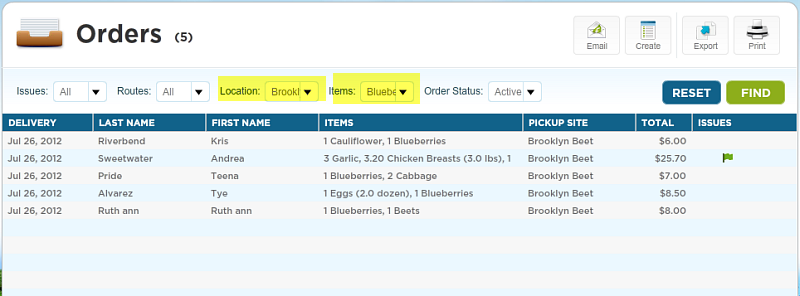
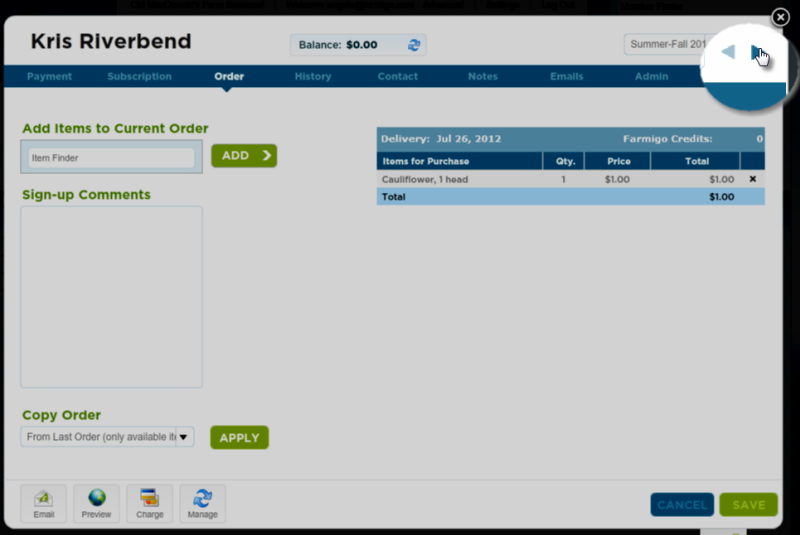
This week Farmigo will be releasing an system update that will add some Oomph! to your Logistics reports. 

PLEASE NOTE:  You will no longer be able to generate the Member Pick-up Details report for past delivery dates!  


Read More

Early Bird Catches the Worm!

8/23/2012

 
Picture
As the summer starts to wind down, some of you may have already begun planning for the next season.  For those of you who manage deliveries year-round, we encourage you to take this opportunity to update your delivery schedules from your Farmigo Dashboard.  


For those of you who offer your members seasonal shares, please email support@farmigo.com so that we set up your next season.  There are a lot of benefits to setting up your next season now.  For starters, you can begin promoting sign-ups for your next season among your current share members.  You can also begin collecting revenue to help with all the expenses that are required when preparing for your next season.

Update Delivery Schedules for Ongoing Deliveries

If your members have signed up for a continuous subscription to your CSA, please remember to regularly add dates to your delivery schedules.  To edit or add dates to your delivery schedules, go to the Settings link at the top of your Dashboard.  Then click on the dates so that they turn blue in order to schedule a delivery for that date.
Picture
Picture

Good Year? Set up a Fall or Winter Season

Some of you may have been promoting a Fall or Winter share already.  But some of you may have only recently determined that you are prepared to offer a Fall or Winter this year.  If you do not have any sign-ups yet for your Fall or Winter shares, please email support@farmigo.com so that we can set up a unique sign-up page for those seasons.  The new link will allow current and new members to sign up for the share at any time and provide you with a unique link for marketing the Fall or Winter season.

Jump Start Sign-ups for Next Season

As your members have gushed over the beautiful produce that they’ve received all season, this is the perfect time to ask them to sign up for your next season!  Please email support@farmigo.com when you are ready to set up your next season.  If you could include answers to the following questions, it will allow us to set up your season very quickly:

  1. Are the delivery days for the new season the same as a previous season? If so, which season? If they are different, what are the delivery days (M,T,W, etc) of the new season?
  2. What is the start and end date the new season? (We know that Mother Nature may have different plans for your start and end dates, and that's okay - we can always change them. What's most important is that the number of weeks in the season is accurate.)
  3. Are the payment plans you want to offer for the new season the same as a previous season? If so, which season? If they are different, which payment plans would you like to offer this season? 
  4. Are the schedules (weekly, biweekly, etc) for the new season the same as a previous season? If so, which season?  
  5. Are the delivery locations for the new season the same as a previous season? If so, which season?
  6. Are the shares and options for the new season the same as those from a previous season? If so, which season? 
  7. When would you like to start taking sign-ups for the new season? 

After we have set up your new season, we will ask you to review your new season and set up any schedules, shares, or locations that we couldn’t copy from a previous season.  To review the settings for the new season, you will need make sure that you switch seasons when working in each part of your Dashboard.

Switching seasons in the Routes manager

Picture

Switching seasons in the Items manager

Picture
Once you have tested your new sign-up link and verified all settings, you will be ready to start taking sign-ups!  After your current season has ended, you will then email support@farmigo.com so that we activate your new season and you can begin managing deliveries.  

Managing Rejected Payments

8/9/2012

 
Today’s tip aims to help you understand and manage rejected payments. If a member is set up with an automatic form of payment including credit card, electronic check, or paypal, it is possible that at some point their payment will be rejected. First, let’s understand why a payment might be rejected. Then, let’s go through how to manage a rejected payment.

How do I know a member’s payment was rejected?

The first indication a member’s payment was rejected is an automated email called “Payment Failure.” This email is sent to your member when a payment fails, and if you are CC’d, it will send to you as well. When you receive this email, you should go to your dashboard and open the member’s card. 
Picture
In the member’s card look for the payment with the orange warning triangle and the status rejected. Also, look for a note that should provide insight as to why the payment failed (ie: credit card has expired). 
Picture

What should I do?


Step 1: Figure out why the payment was rejected. First, identify if the payment was made with a credit card, e-check, or paypal.

Credit Card (Authorize.net)

Authorize.net provides helpful support resources to help you understand why a payment was rejected. Click here to learn more about how to manage a rejected credit card in authorize.net.

Also, check out these helpful videos to learn more about authorize.net.

E-Check (Check Gateway)

Login to your account at Checkgateway.com. Find the member log with the rejected payment. You will see a BO Exceptions (a code entered by the bank) or a Return Reason Codes. There are links in your check gateway account for two PDF’s that help you decipher these codes, or, you can download them here:
BO Exceptions
File Size: 38 kb
File Type: pdf
Download File

Return Reason Codes
File Size: 32 kb
File Type: pdf
Download File

Paypal

When you login to paypal, you will see one of the following messages if a payment failed:
  • We cannot process your payment at this time”
  • The financial source you used cannot be processed. Please contact us for more information. (888) 221-1161
The best thing to do is call Paypal at (888) 221-1161 to understand the reason for the rejected payment. 


Step 2: Now that you understand why the payment was rejected, contact the member to agree upon how to charge them for their order. 

Click on the contact tab of their member card, pick up the phone, and give your member a ring.  Depending on what the issue was, you will either need to edit the member’s bank account information or just try to chare their account again.

Update account information
Open the member’s card in the dashboard and click the manage button. Here, you can re-enter the member’s credit card/bank account information. Farmigo does not allow you to see the member’s info that is on file for their own safety. Once you have update the member’s information, press save.
Picture
Charge the member:
The next step is to charge the member. Click on the charge button.
1. Enter the amount you would like to charge the member
2. Select the preferred payment method
3. Charge the member

If the transaction worked, you will see a message that says the transaction was completed successfully and the payment will be recorded in the member’s card.  If the transaction does not go through, ask the customer if there is another account/credit card you could try.

Picture

Common reasons a member’s payment would be rejected:

  • Insufficient funds
  • Account closed/invalid
  • Account numbers entered were incorrect
  • Address/zip code do not match the information on file for the bank account, credit/debit card, or PayPal account

How Filters Help You to Take Action

8/3/2012

 
Uh oh!  Johny didn’t secure the blueberry harvest last night.  In the morning you discover that the animals have raided several boxes.  Now you only have enough blueberries harvested to meet the demands of a only few pick-up locations.  You will not be able to deliver blueberries to members who pick up at Brooklyn Beet ...


Farmigo is here to help you manage this crisis!  Today’s tip focuses on how the filters featured in multiple parts of the Dashboard can help you to quickly pull together the information that you need and take action.

Perform Repeated Actions Faster

In unique circumstances, you may need to make changes to the accounts for a large group of members.  Filters help you to quickly identify and display the relevant group of members that you need to adjust.  

For example, you’ve decided that you will remove blueberries from the orders of members who are picking up at Brooklyn Beet.  First you go to the Orders module (found under the Members menu).  Then you set to Location filter to “Brooklyn Beet” and Items filter to “Blueberries”. This will narrow the group of members with orders from 14 to 5.

Before filter

Picture

After filter

Picture
Now you may click on the first member in this filtered list and look under the Order tab of her member card.  You remove blueberries from her order and save changes. Then, looking in the upper right-hand corner of the member’s card, you see 2 back-to-back blue arrows. When you click on the one on the right, you flip immediately to the Order tab of the next member so that you may quickly make the same adjustment.
Picture
You then go to the Payment tab of the first member in the filtered list and $5 of Farmigo Credit.  Again, you use the 2 back-to-back blue arrows to quickly flip through the Payment tab for all members in the filtered list.

Target Group Emails

Picture
When you would like to send the same message to a specific segment of your membership, you may use filters to identify the segment and then use the Email button found in the upper right-hand corner of the Accounts, Subscriptions, Orders, or Waitlist modules of your Dashboard.  To create a more personalized message, you may start by creating a template in the Connect module and inserting dynamic field in your message.

To respond to the “Blueberry Situation”, for example, you can go to the Connect module (found under the Market menu) and click the green plus sign in the upper right-hand corner to create a new template.  Then you may add dynamic fields, such as [First Name], to personalize the message.
Picture
Return to the Orders module (found under the Members menu) and set the Location filter to “Brooklyn Beet” and the Items filter to “Blueberries”.  Then click on the Email button in the upper right corner of the Orders module.  The “To:” field will indicate which segment of your membership will receive the message.  Then you may select the template that you just created and click SEND.
Picture

How to Manage Delivery Schedules

8/2/2012

 
Your Schedules are the most integral part of your Farmigo system.  The goal of this week's tip is to illustrate how your Schedules interact with each part of your system.

Charging for Your Shares
YEAR-ROUND CSAs:  Whether you make deliveries year-round or on an ongoing basis, a share's assigned schedule determines when your members are charged for that share.

SEASONAL CSAs:  If your Farmigo system is defined by finite seasons, the total price of a share for the season is determined by the number of distributions in its assigned schedule.  For example, let's say that you deliver a produce box for 16 weeks each summer.  You estimate that the average price of your share is $15 per delivery.  To calculate the total price of the share for the season, you take the number of weeks scheduled times the per delivery price of the share to get $240 for the season.
Picture

Managing Share prices on a per delivery basis offer you and your members more flexibility in managing your shares.  If you deliver your shares on an ongoing basis, members may conveniently put their deliveries on hold instead of canceling their subscription.  If you manage seasonal deliveries, this logic helps you to automatically pro-rate the seasonal price of your share for late signups.


Planning Your Delivery Routes
When one of your pick-up locations is assigned to a Route, it is assigned to the same delivery day as that Route.  For a share to be available at that pick-up location, the share's assigned schedule must include the same delivery day as that pick-up location.  For example, the Full Share above is assigned to the Weekly schedule.  The only delivery days selected in the Weekly schedule are Wednesday and Thursday. Now you want offer pick-up for the Full Share on Sundays at the farm.  Below are the steps that you would take to add a delivery day to a Schedule and Route:
Picture
STEP 1
Click on the Settings link at the top of the Dashboard.  From the drop-down box that appears under the Schedule tab, select the Schedule where you would like to add the additional day.  (You may need to follow steps 1 and 2 for multiple schedules.)

Picture
STEP 2
Add the new day to the existing schedule by clicking on the relevant dates in the calendar.  The day will turn blue in the calendar in order to indicate that it has been selected.  In our example, we selected all of the Sundays for the same weeks that we are making deliveries on Wednesday and Thursday.

Then SAVE CHANGES and close the Settings box.

Picture
STEP 3
Go to the Routes module, under the Status Menu.  Click on the green plus sign in the upper right-hand corner in order to create a new Route.  Assign the new route to the delivery day that you just created.  In our example, we added a Route for Sunday.

Then click on the button to "Save & Close."

Picture
STEP 4
From the Routes module, click on the green balloon symbol in the upper right-hand corner in order to create a new location.  Assign the new location to the appropriate Route and Save Changes.  In our example, we assigned the new Farm Pickup option to the new Sunday Route.  Now when a new member selects this option to pick up at the Farm on Sundays, they will be able to select the Full Share in the next step of the signup process.  This is because the Weekly schedule is assigned to the Full Share.

Picture
What if I don't know how many distributions I will have?  Plan conservatively.  

For those of you that manage your deliveries seasonally, it is sometimes difficult to predict how many deliveries you can squeeze into a season.  I recommend minimizing expectations and scheduling the minimum number of deliveries that you believe is reasonable for the season.  If you find at the end of the season that you may offer additional produce, advertise this surplus as a BONUS for your members at a reduced price per delivery or at no additional cost.  To offer bonus deliveries to your members, take the following steps:

  1. Create a unique schedule for the extra deliveries.
  2. Create a share at the discounted delivery price or at a price of $0; assign the share to the unique schedule created in step 1.
  3. Ask members to log into their accounts and add the Bonus Deliveries to their subscription. (Email support@farmigo.com if the feature which allows members to add to their subscriptiontion is not currently turned on.)

To learn more, visit the Farmigo Help Site. 

What tips can you share about planning deliveries?  Do you find pro-rating shares to be a good strategy for increasing membership?

    Subscribe to the tip of the week mailing list

    Categories

    All
    Accounting & Finances
    Communicating With Members
    Dashboard Management
    Images & Photos
    Knowing Support
    Managing Deliveries
    Managing Locations
    Managing Payments
    Managing Sign Ups
    Member's Perspective
    Reports
    System Updates And New Features
    Web Store

    Archives

    March 2014
    February 2014
    January 2014
    December 2013
    November 2013
    October 2013
    September 2013
    August 2013
    July 2013
    June 2013
    May 2013
    April 2013
    March 2013
    February 2013
    January 2013
    December 2012
    November 2012
    October 2012
    September 2012
    August 2012
    July 2012
    June 2012
    May 2012
    April 2012
    March 2012
    February 2012