Farmigo Support
  • HOME
  • Browse Help & Support
  • Farmigo Mobile
  • Tip of the Week
  • Why Farmigo?
  • Contact Support

See What Your Members See

6/26/2012

 
Setting up dummy accounts for system administrators or non-member site hosts
Setting up a dummy account helps you to better understand how your customers interact with your system and allows you to test email templates. Also site hosts will benefit from having an account even if they don't have a subscription so that they can access reports that help them with distribution. Below we will show you how to manage different accounts in your Farmigo system that won't affect your subscription numbers or financials. 

Take these steps to set up a dummy account:
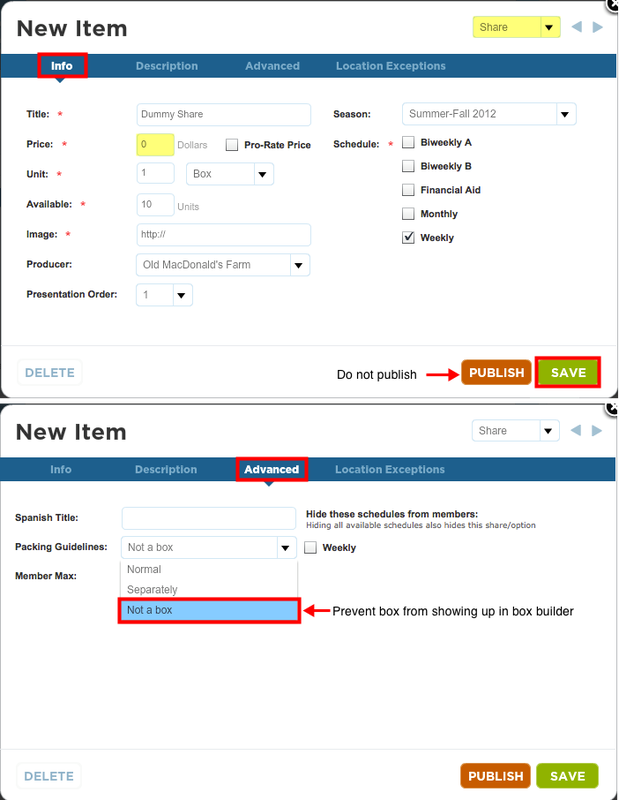
1. Create a dummy share in the items module. Set the price at $0 and keep the item unpublished. In the Advanced settings, set the packing guidelines as "Not a box" to prevent this share from showing up in the box builder.
Picture
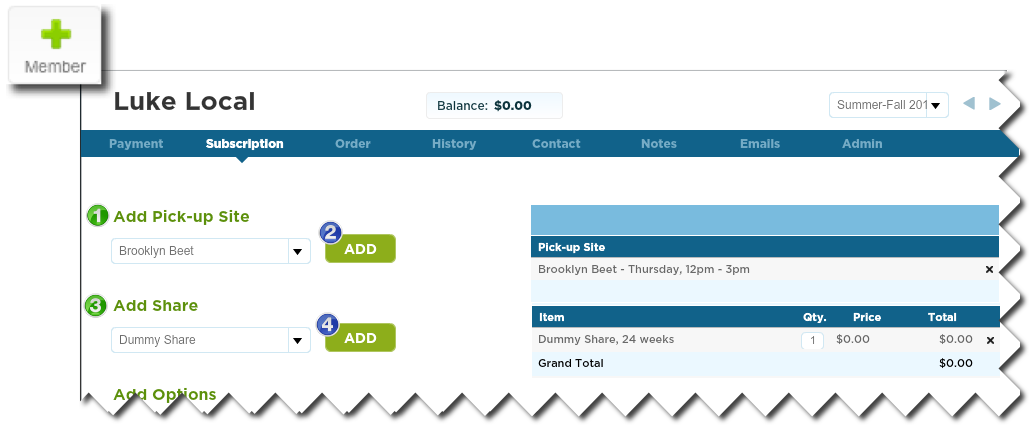
2. Create the dummy member account in the subscriptions module
  • Enter the subscriptions module
  • Click on the green plus sign to add a new Member
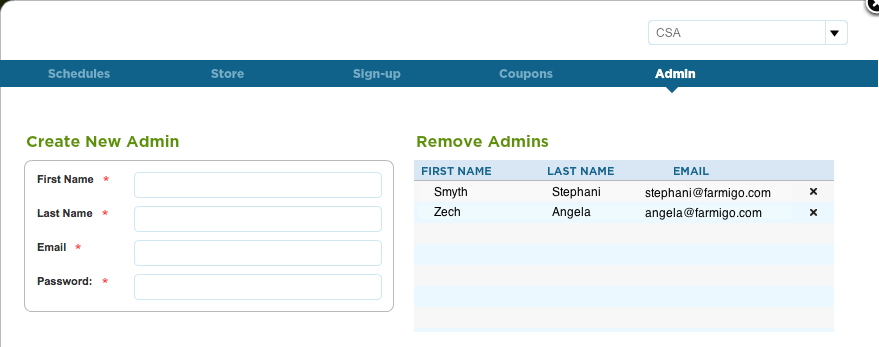
  • Enter the admin/site host contact info and press save
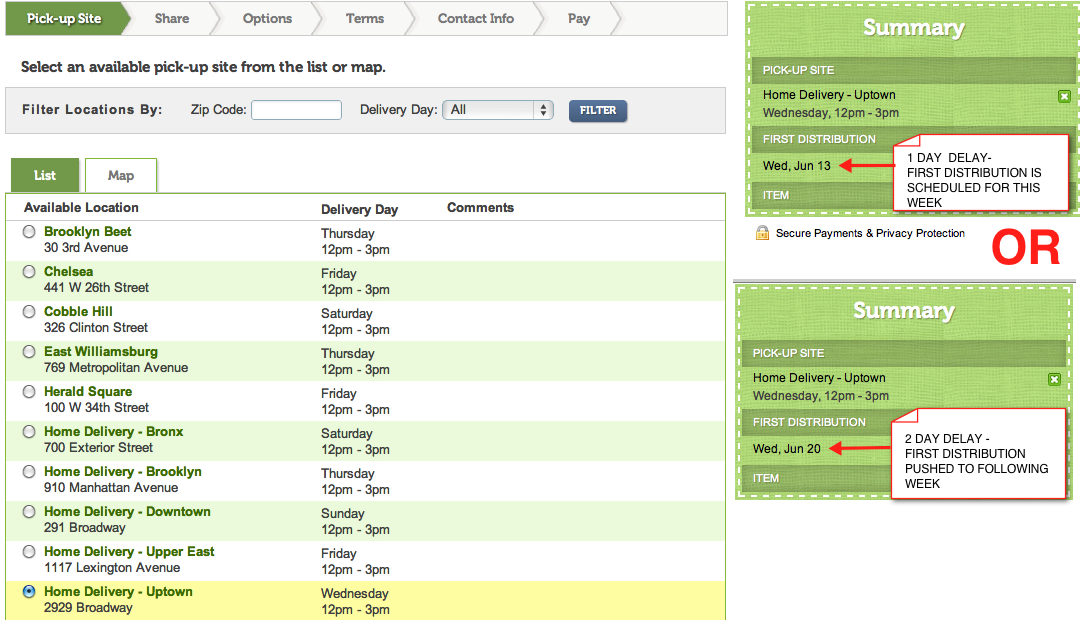
  • Click on the subscription tab and select a delivery location, then click add. Select the 'Dummy Share' you recently created, then click add. Save your changes.
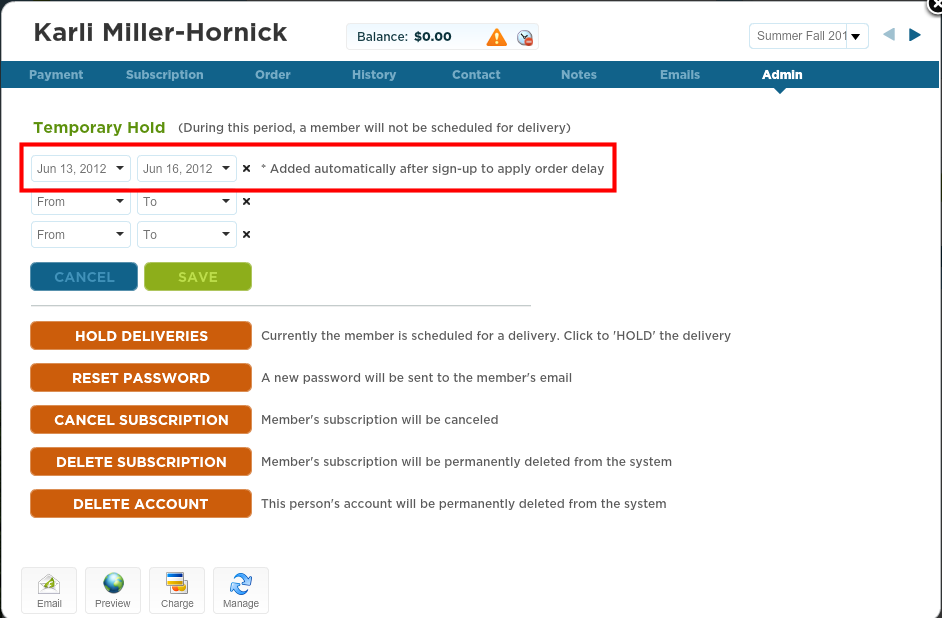
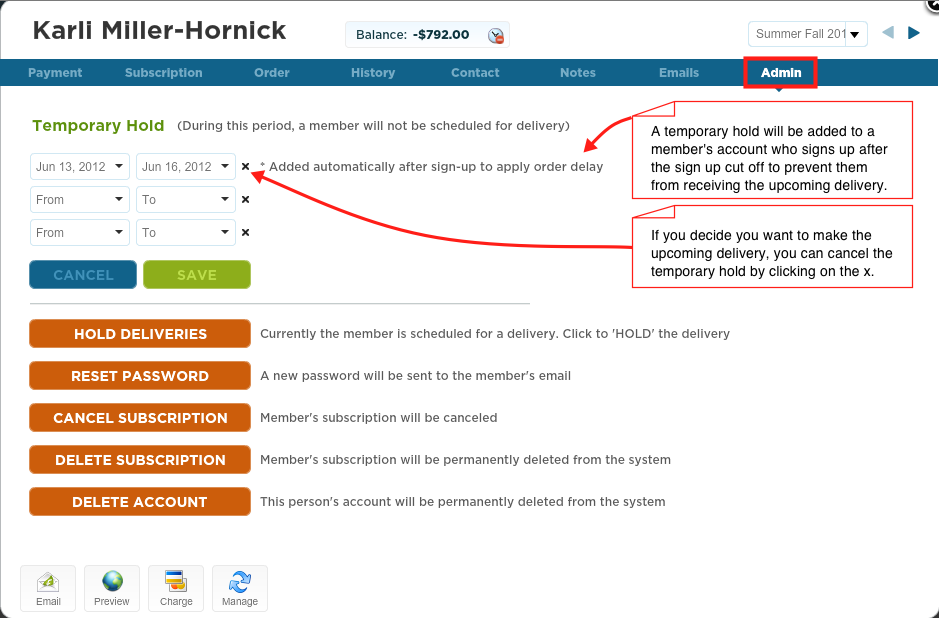
  • A member who is added in the back end of the system is automatically assigned the temporary password farmfresh
Picture
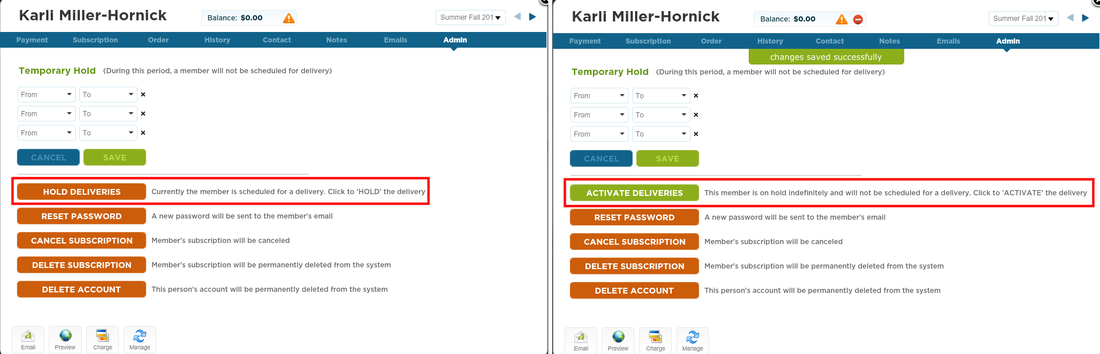
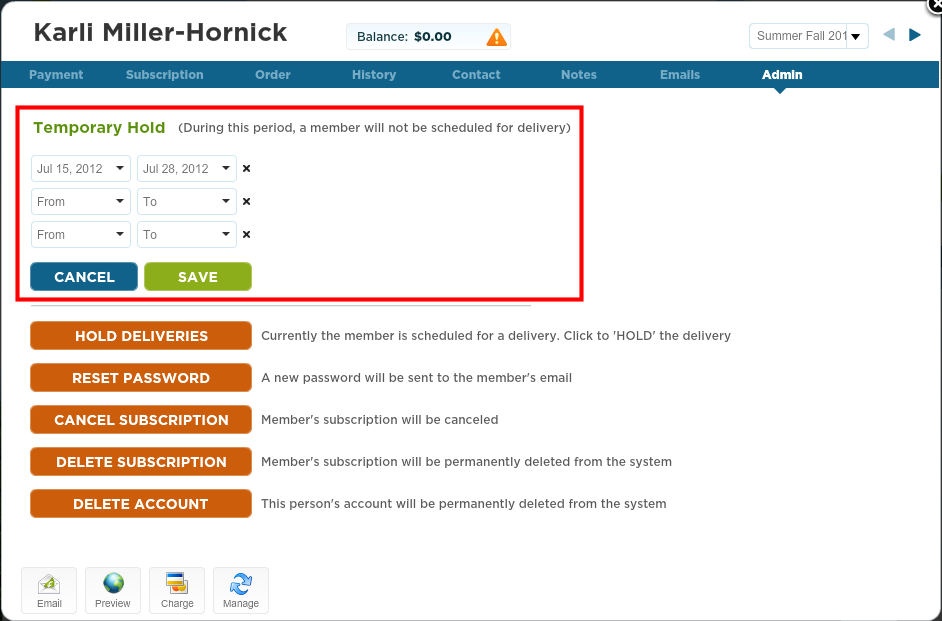
Use dummy accounts to set up accounts for your admins to test email templates or get to see the customer side of the system. Dummy accounts are also the best way to create accounts for site hosts who do not actually have a share with you.

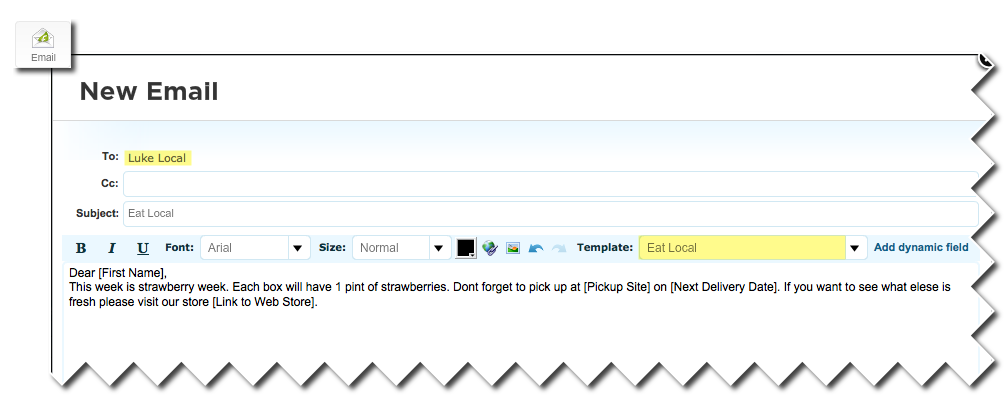
Test an email template:
Use your dummy account to test email templates. Once you create the template in the connect module, open your personal dummy account card and click the email button. Then select the template you would like to test and press send.
Picture
Not receiving an email template? Check your spam folder!
We have been hearing from some CSA's that their members are not receiving emails that are sent through farmigo. When we follow up with the members, we've learned for the most part this is because emails are being marked as spam. To ensure your members are receiving emails through the farmigo system, ask them to add farmigo.[your Farmigo URL]@farmigo-csa-hr.appspot.com as a trusted email address in their email accounts.

Delivery Holds and Dummy Email Accounts

6/19/2012

 
Check out the new interface for managing member delivery holds! Read below to understand the new features:
How to place a member on an indefinite hold:
  1. Open member card and click on admin tab.
  2. Select the hold delivery button.
  3. Member will not receive deliveries again until you go back into the member card and click the activate delivery button.
Picture
How to place a member on short term hold:
  1. Select a date range from the drop down menus below Temporary Hold area.
  2. Press Save
  3. During the selected dates, a member will not be scheduled for delivery.
  4. To remove a short term hold, click the x to the right of it and press save.
Picture
Delivery holds due to sign up delays:
The system will automatically put a member on hold at sign up if they sign up after the sign up delay has passed. The system will indicate if a hold is due to a sign up delay. If you decide that you would actually like to deliver to this member for the upcoming delivery, you can remove the temporary hold by clicking the x to the right of the dates.  

***Remember, use caution before removing the delivery hold!  As soon as the new member signed up, they may have received an automated email indicating when they may expect their first delivery.  If you remove the hold for that coming week's delivery, remember to email them and notify them that their first delivery date has changed.  Also, if you pro-rate you shares, please be aware that the new member will not have paid for this extra delivery.
Picture

Dummy Email Accounts 

When you come across a member who does not have an email address or whose email address you do not know, we recommend creating a dummy email address for them using the following guidelines:
[email protected]


EXAMPLE:
[email protected]
Here, the dummy email address is formulated by taking the members full name, then "@", and then the name of your business plus ".com".

Understanding Member Access Hours

6/13/2012

 
Today, we want to explain how member access hours function. There are two parts to controlling member access hours. 

1. Sign-Up: New Member Sign Up Cut Off
The number of days before delivery a new member must sign up by or their first delivery date will be pushed to the following week

2. Store:  Upcoming Order Hours  
The time members can login and make changes to their upcoming order i.e. change a pick up site/add items in the webstore
 
How do I know what my current member access hours are?
If you are unsure of your current member access hour settings, you can check them in the settings area of the dashboard.
Picture

How Does it Work?

New Member Sign-Up Cut-Off
The new member sign-up timeframe is controlled by setting a fixed number of days to cut off sign-ups before that coming week's delivery. For example, above, the new member sign-up delay is set to 1 day before delivery. This means that for a new member to receive that coming Sunday's delivery, the new member must sign up by Saturday at midnight. If a member signs up once the cut-off time has passed their first delivery will not be scheduled for the upcoming delivery. Instead, the member's account will be put on a temporary hold for that week's delivery and then they will be schedule to receive their first delivery for the following Sunday.
Picture
If you decide that you actually do want to deliver to the new member for the upcoming delivery, you can go into their member card and activate their delivery as shown below.  But use caution before removing the delivery hold!  As soon as the new member signed up, they may have received an automated email indicating when they may expect their first delivery.  If you remove the hold for that coming week's delivery, remember to email them and notify them that their first delivery date has changed.  Also, if you pro-rate you shares, please be aware that the new member will not have paid for this extra delivery.
Picture
Ask Yourself: How many days in advance do you need to know about a new member sign-up in order to prepare their share for the upcoming delivery? One day, two days, three days? Maybe you need an entire week. If you need your sign-up delay changed, please let us know by emailing [email protected].

Upcoming Order Hours
You may control times during which a member may adjust their upcoming order based on the delivery day.  For each of your delivery days, we can set a opening hour and closing hour for members to log into their account and make the following changes for upcoming orders:
 
1. Put their upcoming delivery on hold*
2. Change their pick up location*
3. Update their subscription*
4. Add items to their delivery from the Web Store
5. Customize their share (for CSA's doing customized boxes)
 

*Members can only take these actions if you allow them to. These settings may be changed by a Farmigo support team member.

Opening Hour
The earliest members can access their accounts for an upcoming delivery is the day after their most recent delivery. For example, if they receive a delivery on Wednesday, they will be able to begin making changes for the upcoming order on Thursday morning. If you want time to update the web store, we can set the open hour to a later time to allow for changes in inventory/item availability.

Closing Hour
Again, you want to ask yourself, "How many days in advance do I need to know about things like delivery holds/change in delivery location, as well as total orders placed in the web store in order to prepare an upcoming delivery?"

Closing hours can be set to a different time for each delivery day.  Therefore, each delivery day can have a different closing time or alternatively, they can each have the same closing time.
Picture
Same closing time:

Picture
Different Closing Times/Days:


BEST PRACTICE!
Make sure that you communicate your hours with members clearly. Here are some of the best ways to keep your members informed:
 
1. List hours in your policy and on your website. 
 
2. Mention hours in the instructions tab for each pick up site (Routes Module) so members will see them when they login to their account. 
 
3. Set up an email alert that sends out the final day that members must make changes for their upcoming order reminding them that they must log in and make the necessary changes. 

Remember, if you have any questions or need changes to be made to your member access hours, please email us at [email protected]

Add and Remove Your Own Admins to Access the Dashboard!

6/7/2012

 
This week we released a new feature that allows you to add and remove your own administrators to your dashboard! To find this brand new feature, click on settings at the very top of your dashboard. This is the same place where you currently manage your schedules. When you open settings, you will see a new tab in the dark blue bar across the top called Admin.
Picture

The New Admin Interface

Picture
How to add and remove admins:
To add a new admin, fill in their First Name, Last Name, Email, and Password. ***The password must be more than 6 characters. Press save. Once you add a new admin they will show up on the right side. Now, these people will have access to the dashboard. If you would like these people to be added to the TOW mailing list, please let us know by emailing [email protected].

To remove an admin, click on the x to the right of their information and press save. We hope this improvement adds a bit of simplicity to your life as many of you begin making deliveries for your CSA.

    Subscribe to the tip of the week mailing list

    Categories

    All
    Accounting & Finances
    Communicating With Members
    Dashboard Management
    Images & Photos
    Knowing Support
    Managing Deliveries
    Managing Locations
    Managing Payments
    Managing Sign Ups
    Member's Perspective
    Reports
    System Updates And New Features
    Web Store

    Archives

    March 2014
    February 2014
    January 2014
    December 2013
    November 2013
    October 2013
    September 2013
    August 2013
    July 2013
    June 2013
    May 2013
    April 2013
    March 2013
    February 2013
    January 2013
    December 2012
    November 2012
    October 2012
    September 2012
    August 2012
    July 2012
    June 2012
    May 2012
    April 2012
    March 2012
    February 2012