| Many of you want to offer items that require a deposit, such as a Thanksgiving Turkey or a large portion of meat. If you want to be able to accept and track deposits for an item that will be delivered in the future, we have outlined some guidelines below to help you manage this in your Farmigo system. There are two different methods that we recommend: |  |
- Accepting Deposits as a Share or Option: This method is recommend for Seasonal configurations. This method is NOT recommended for Ongoing configurations.
- Accepting Deposits as a Store Item: This method is strongly recommend for Ongoing configurations. Seasonal configurations may use it too.
Click "Read More" to read the rest of this tip.
Meat Deposits as a Share or Option
When members sign up, they may choose to make a deposit for a future delivery of meat. If you allow members to add to their current subscription, your current members may select it from the account link.
This method is recommend for Seasonal configurations. This method is NOT recommended for Ongoing configurations.
1. Set up a Share or Option in order to accept the deposit:
This method is recommend for Seasonal configurations. This method is NOT recommended for Ongoing configurations.
1. Set up a Share or Option in order to accept the deposit:
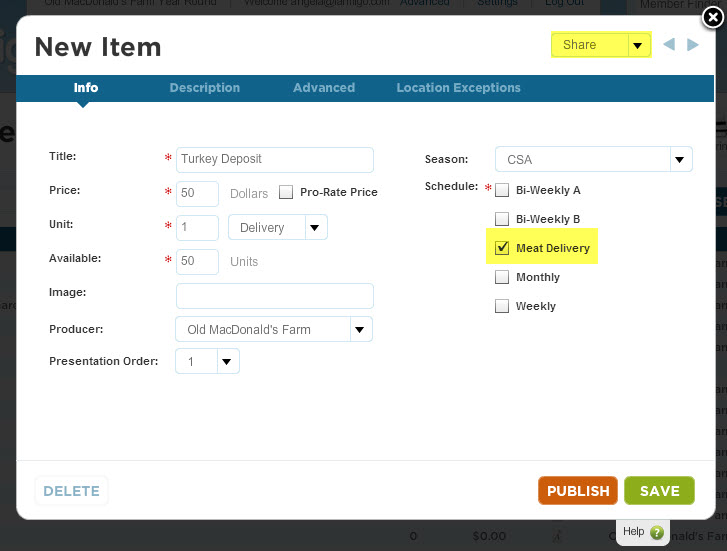
- From the settings link at the top of the dashboard, click the green plus sign to create a new schedule with a suggested title of “Meat Delivery”. Select only ONE distribution date for EACH delivery day and save changes. (If you will be making a second delivery, I recommend creating a separate schedule, i.e. “Meat Delivery 2”)
- Create a new share/option with the word “deposit” in the title. Assign the share/option to the “Meat Delivery” schedule and assign a price based on the deposit that you want to demand. Then publish the item to the sign-up process.
2. Deliver the Order: Use the delivery reports that you normally use to make deliveries. They will show who is scheduled to receive a meat order according to the dates scheduled in the “Meat Delivery” schedule.
3. Track Additional Payments: Now that you are ready to deliver the meat, you want to ask your members to complete payment for the meat ordered. You have 2 options for managing this:
- Option 1 - Add a fee for the amount owed after the delivery has taken place: After identifying the remaining amount that each member owes, filter the list of subscriptions in the Subscriptions manager according to those with a deposit share/option and add a fee from the payment tab of the member file for the remaining amount owed. The value of this fee will be applied as a negative amount (debit) against the member’s balance. If necessary, you may email these members the [link to payment] so that they may pay electronically or you may ask them to send a check.
- Option 2 - Add a store item to the members’ order BEFORE the delivery is recorded as received in Farmigo in order to charge them the remaining amount owed: Create an unpublished store item with a price of $0; it may be called “Meat Delivered” for instance. When you filter the list of members with the relevant share/option, add this item under the Order tab of the member file and edit the price for the remaining amount owed for their meat delivery. The value of this order will be applied against the member’s balance after the order is processed. If necessary, you may email these member the [link to payment] so that they may pay electronically or you may ask them to send a check or pay by cash.
Meat Deposits as a Store Item
Using this method, you will set up the deposit as a store item. Members may access the store during store hours and choose the item to make a deposit for the meat. The member will be charged for that deposit based on your store payment method settings (i.e. they may be charged at checkout or the deposit may be applied against their balance).
This method is strongly recommend for Ongoing configurations. Seasonal configurations may use it too.
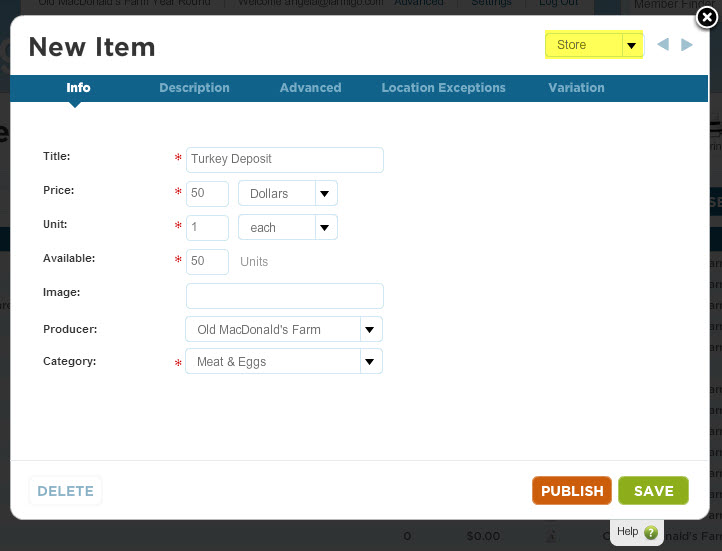
1. Set up the store item: Create a store item with the word “deposit” in the title. Assign the item a price based on the deposit that you want to demand. Then publish the item to the appropriate category in the store.
This method is strongly recommend for Ongoing configurations. Seasonal configurations may use it too.
1. Set up the store item: Create a store item with the word “deposit” in the title. Assign the item a price based on the deposit that you want to demand. Then publish the item to the appropriate category in the store.
2. Receive and Track Orders: Members may select this item from the store during normal store hours. Before the orders are processed for the next delivery, go to the Orders manager in your dashboard and filter the list of orders for members who ordered the deposit item. Assign each member the same flag color (you may choose the color).
3. Determine who will receive the meat: Before the date(s) that you plan to make deliveries, take the following steps:
a. Review all last minute deposit orders and assign them the correct flag.
b. From the Subscriptions manager, send an email to all members with that flag to remind them of when and where they may pick-up their meat order.
c. From the Reports manager, generate the following reports in order to know how many deposits have been made:
- Past Deliveries (Quantity) report with the following settings:
- DATE RANGE includes when you started taking deposits to the date of your most recent delivery.
- BREAKDOWN BY = Members
- INCLUDE = Orders Only
- *Delete columns for items other than the deposit items - Upcoming Store Orders for the upcoming delivery dates. This will allow you to see any last minute deposits that haven’t been processed yet.
4. Tracking Payments: Now that you are ready to deliver the meat, you want to ask your members to complete payment for the meat ordered. You have 2 options for managing this:
Option 1 - Add a fee for the amount owed after the delivery has taken place:
After identifying the remaining amount that each member owes, filter the list of subscriptions according to those with a deposit share/option and add a fee to each of their accounts for the remaining amount owed. The value of this fee will be applied as a negative amount (debit) against the member’s balance. If necessary, you may email these member the [link to payment] so that they may pay electronically or you may ask them to send a check.
Option 2 - Add a store item to the members’ order BEFORE the delivery is recorded as received in Farmigo in order to charge them the remaining amount owed:
Create an unpublished store item with a price of $0; it may be called “Meat Delivered” for instance. When you filter the list of members with the relevant share/option, add this item under the Order tab of the member file and edit the price for the remaining amount owed for their meat delivery. Then:
- The value of this order will be applied against the member’s balance after the order is processed. If necessary, you may email these member the [link to payment] so that they may pay electronically or bring cash or check when picking up their order (you will need to record in Farmigo that you received payment).
- **Since all of these members will have an item on their account indicating that their meat will be delivered, you only need to use the Distribution, Labels, or Member Pick-up Details report to see who gets a delivery. You will not need to use the Past Deliveries (Quantity) report.